Search, Filter & Data Management
How administrators slice and act on attendee data. The Event Attendees page combines a quick name/company search, an advanced criteria builder that can combine profile and survey properties, customisable column views you can save and reuse, plus a row of bulk actions — activate, deactivate, multi-edit, export, and downloads — all on the same selection.
1. The Event Attendees Page 00:00 – 00:24
The single page where administrators look at every attendee in the event.
Narrator · 00:00 – 00:24 In this session we look at how we search and filter our attendees, and how we use the data provided from the survey and from the profiles to gather information. Once you have a given set of attendees — like in this case, this event has 1,148 participants — you have an option to navigate through and search.
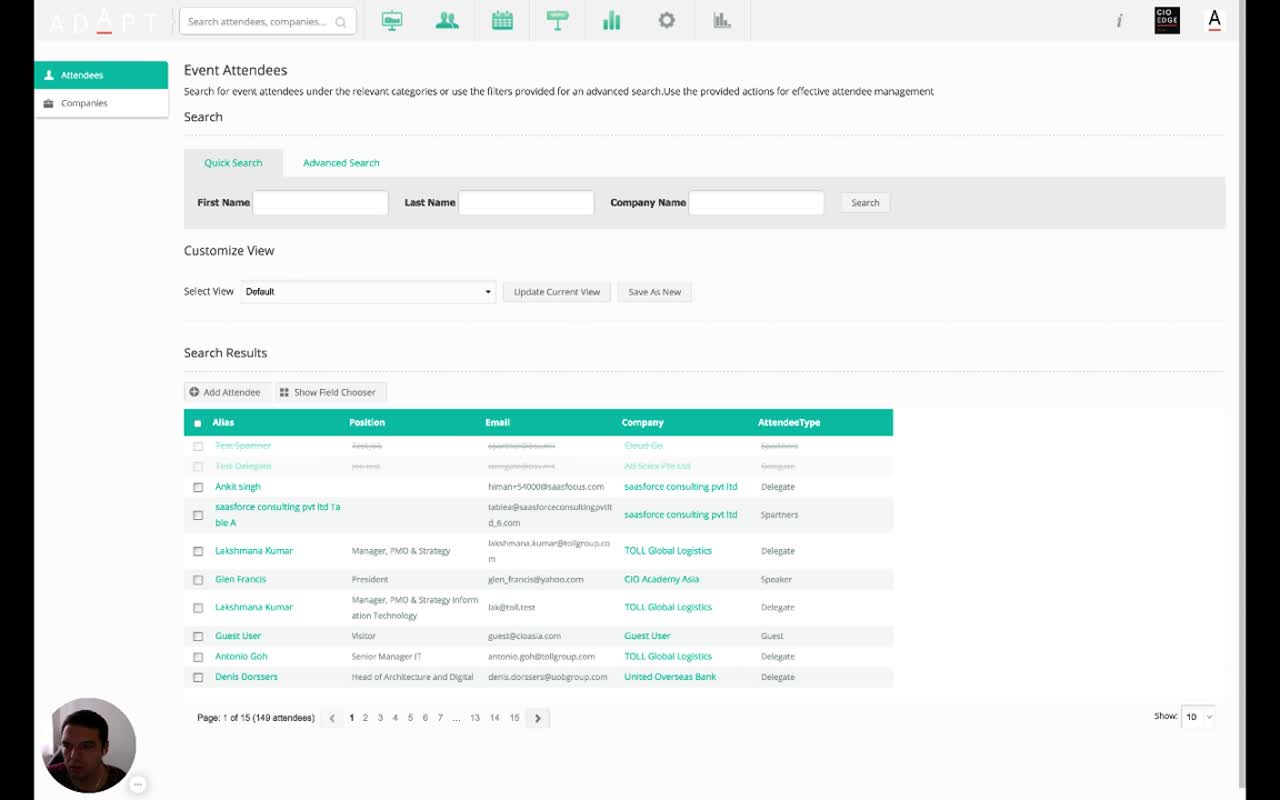
2. Quick Search 00:24 – 00:30
Three fields, one search — for everyday lookups.
The Quick Search tab lets you search by First Name, Last Name, or Company Name. Useful when you know who you're looking for and just need to get to their record.
3. Advanced Search — Criteria Builder 00:30 – 01:34
Combine profile properties and survey properties with AND logic — as deep as you want.
Narrator · 00:24 – 00:51 What is more important is if you go to advanced search. There you can define different criteria based on what you have in the system. For example, if I select an attendee type — and you'll see the system already starts providing more options — and I select partner.
Narrator · 00:51 – 01:13 The system automatically gives me an option to include a condition like and, and then I can choose from any other profile property or survey property in the system. So if I search for, for example, "Who are the key strategic partners?" — this was a survey question — I can choose Queensland Treasury.
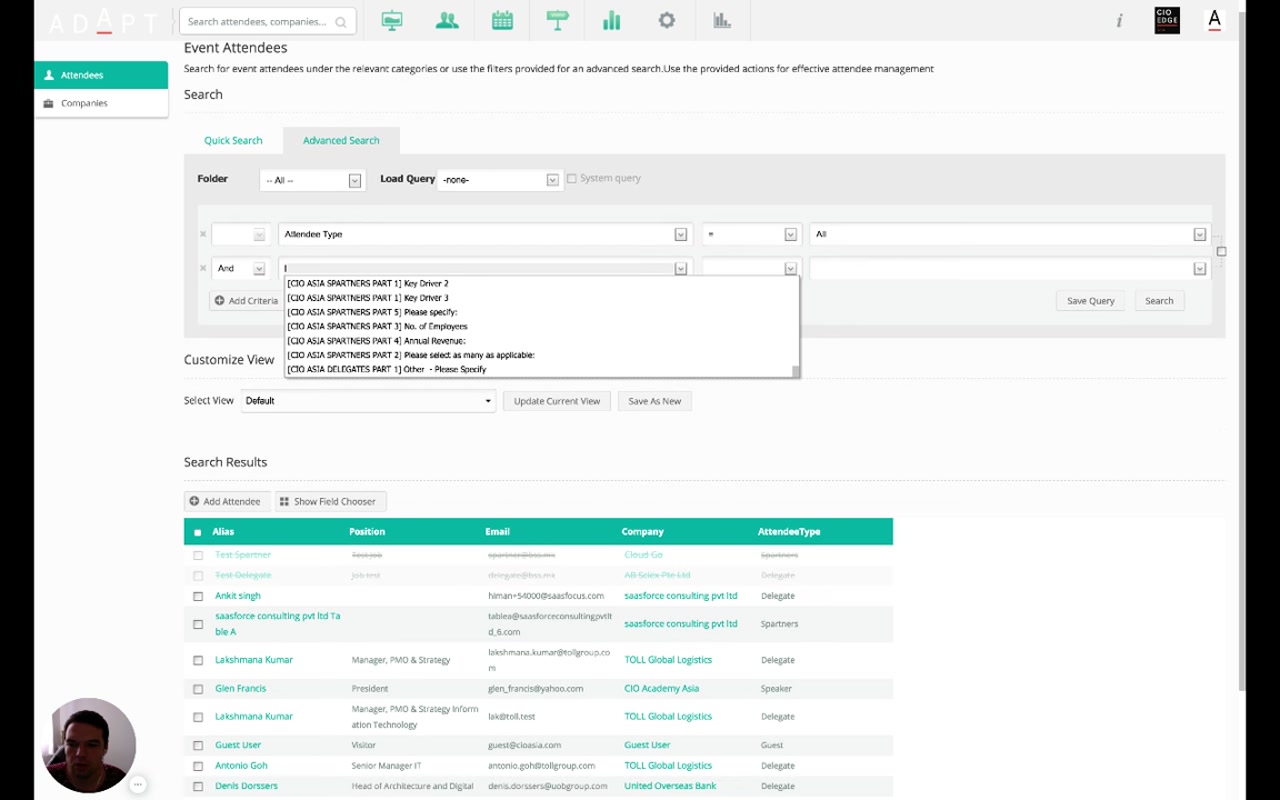
Narrator · 01:13 – 01:34 I click Queensland Treasury and start the search. The system gives me only the attendees who have Queensland Treasury as a partner and who are partners themselves. So you have full flexibility in how you define and look through your data.
| Concept | What it does |
|---|---|
| Folder filter | Scope the criteria to a folder of forms. |
| Load Query | Pull a previously saved advanced-search query. |
| Criteria row | One field + operator + value triple. Add as many as needed with + Add Criteria. |
| Field dropdown | Either a profile property (Attendee Type, Company, Email…) or a survey property — every form question becomes filterable. |
| Save Query | Save the criteria set to reuse next time (named query). |
4. Customize View & Saved Views 01:34 – 02:46
Pick the columns you want; save the layout as a named view.
Narrator · 01:34 – 01:54 But that's not all. You also can customize your view — what you see as columns. If you click Show Field Chooser, you have all properties available for that attendee and that company. From here, for example, if I select the job title or job level, or an office location.
Narrator · 01:54 – 02:22 I tick the boxes and you see on the left it adds more information. If I am choosing from the survey questions — like "Who do you consider as key strategic partners?" — the system provides another column with the information that the partners have placed into their profile.
Show Field Chooser opens a panel listing every available column — every profile field plus every survey question. Tick / untick to add or remove columns from the table. Survey-property columns work the same way as profile columns: the cell shows that attendee's answer.
Narrator · 02:22 – 02:46 Having this view, you can then say "Queensland Treasury Partner Review" and click Save as New. So in the next step, when you come into the system, you already have that saved as a customized view, and you can click through and access it immediately.
The Customize View row above the table holds Select View (named saved views), Update Current View, and Save As New. Saved views combine the column selection with the current advanced-search query — so a view is "this set of attendees, displayed with this set of columns".
5. Per-Attendee Inspect & Edit 02:46 – 03:14
Click an attendee to see their full record; edit anything inline.
Narrator · 02:46 – 03:14 As an administrator, you also have a quick overview of each of these participants — what they look like, what data they provided — and you have an ability to edit these attendees manually on their profiles if you have a need for that.
Each row in the results table is clickable. You get a full attendee detail view — the same profile the attendee fills in (Module 5 §3) — with admin-only edit controls for any field. Useful for fixing typos, correcting answers, or maintaining VIP attendees by hand.
6. Bulk Actions — Activate, Deactivate, Multi-Edit, Export 03:14 – 03:56
Tick rows, then run an action across all of them at once.
Narrator · 03:14 – 03:32 The final thing about the data and managing the data is that you have a set of actions you can execute over the selected data. For example, you can activate the attendees in terms of giving them access — or closing access to the profile.
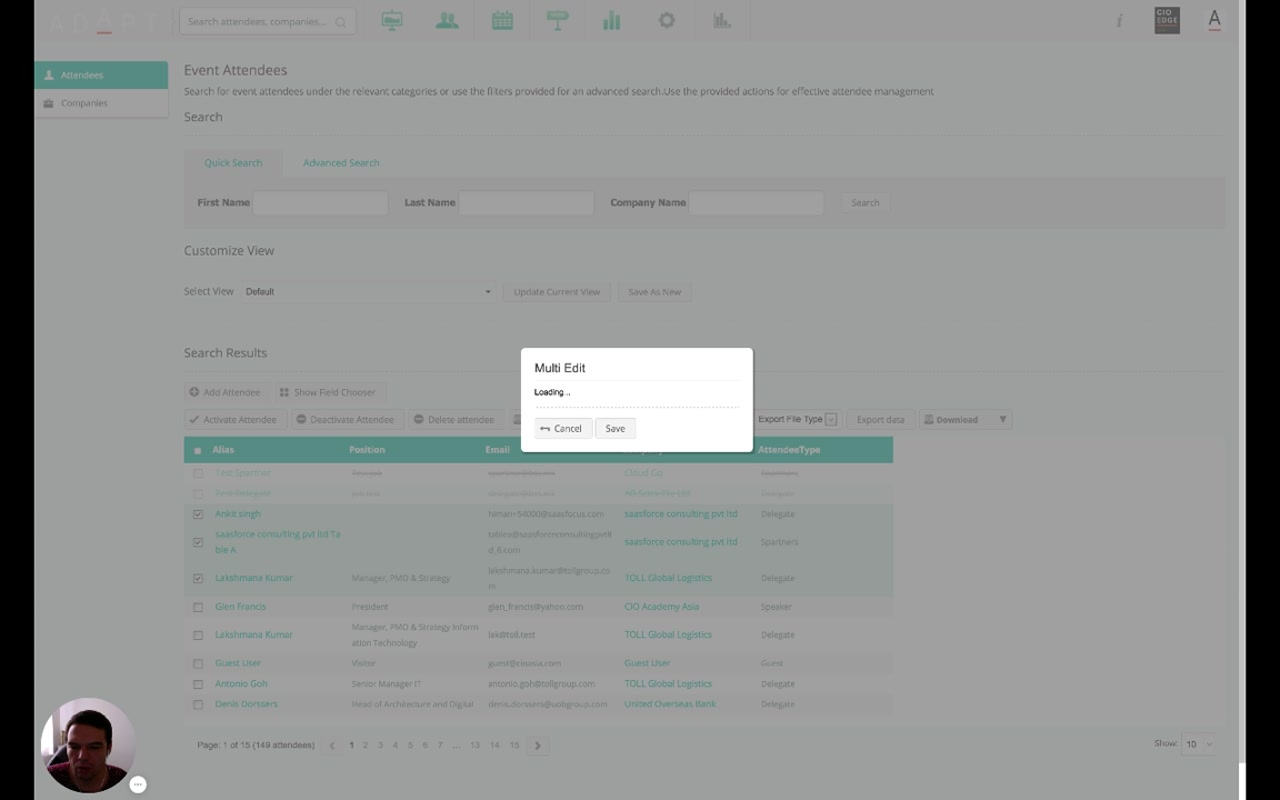
Narrator · 03:32 – 03:56 You can export the data into several formats — XLS, XML, JSON, whatever is currently set up on your portal. And you can execute a bulk update — for example, select these three participants and say Multi Edit and change the company name for them, or change their attendee type, and click Save.
Narrator · 03:56 – 04:22 The system will automatically go through all of them and update their properties as set. You can download handouts, profile PDFs — whatever you have uploaded.
| Action | What it does |
|---|---|
| Activate / Deactivate Attendee | Open or close access to the client panel for selected attendees in bulk. |
| Delete attendee | Remove selected attendees from the event. |
| Multi Edit | Change one or more fields (e.g. company, attendee type) across every selected row at once. |
| Export data | Export the current selection in the configured format(s) — XLS, XML, JSON, etc. |
| Download | Pull down handouts, profile PDFs and other uploaded artifacts for the selection. |
7. Adding an Attendee Manually 04:22 – 04:47
For VIPs or late additions that didn't come through registration.
Narrator · 04:22 – 04:47 If you have a need for a new attendee that came through and needs to be manually input into the system, you click Add Attendee. From here you choose the properties — first name, last name, email — you can even generate a password for them, and choose what type of participant they are and which company they belong to. You then provide all that information into the system, which will make them join the event and be part of the organization.
Add Attendee opens a small form for the essential identity + classification fields. The platform can generate the password automatically. Once saved, the new attendee gets a regular client-panel account scoped to their attendee type — same plan, same forms, same matchmaking pipeline as everyone else.
8. Essence & Takeaways
The one-paragraph version
The Event Attendees page is the operational data layer of the platform. Quick Search handles "find a person fast". Advanced Search is a criteria builder that mixes profile properties and survey properties with AND logic, with named saved queries. Customize View + Show Field Chooser let administrators add any profile or survey field as a column, and save the entire (filter + columns) combo as a named view they can come back to later. Each row drills into a full editable attendee record. Above the results, a bulk-action toolbar lets administrators tick multiple attendees and run an action — Activate, Deactivate, Delete, Multi Edit (change one or more fields across the whole selection), Export data (XLS / XML / JSON / etc.), and Download (handouts, profile PDFs). A separate Add Attendee button handles manual onboarding for VIPs or late additions, with email + password and an attendee-type / company classification.
- An ops runbook for "I need to find / fix / export attendees" tasks.
- A reference for whoever rebuilds or extends the attendee admin UI.
- A list of common saved views every event should have ("Sponsors with no profile", "Delegates without a survey", "Speakers", etc.).
- A QA list when launching a new event — verify search-by-survey-property still works after form changes.
9. Full Transcript
Verbatim narration provided alongside the video.