Print Itineraries & Badges
The bridge between the digital event setup and the physical event day. Once everything is configured and matched, the platform produces the two artifacts the venue actually needs: name badges (printable in multiple layouts and colours, optionally emailable to each attendee) and per-attendee itineraries (PDF, paper-format-aware).
1. Why Onsite Printouts Still Matter 00:00 – 00:23
The mobile app and client panel cover most of the day — but every attendee still needs a badge and many still want a printed itinerary.
Narrator · 00:00 – 00:23 The final bit about organizing and managing the event is having your data and printouts ready for the onsite delivery. One part of that is to select your participants and then go into Print Badges.
This module sits at the very end of the prep cycle. By this point you have:
- A complete attendee list (Modules 5–7).
- A matched and applied schedule (Module 9).
- An attendee app that already shows everyone their itinerary (Module 11).
What's left is the physical artefacts: the name badges everyone wears at the venue, and the printed back-up itineraries for attendees who prefer paper.
2. Select Your Participants 00:00 – 00:23
Both flows start the same way: filter / search to the attendees you want, tick their rows, then run the print action.

Workflow:
- Use Quick Search, Advanced Search, or a saved view (Module 7) to surface the attendees you need to print for.
- Tick the rows — individually, or via the column-header checkbox to select all on the page.
- Open the Print actions dropdown in the toolbar.
- Choose Print Badges or Print Itinerary.
3. Print Badges — Layout & Color 00:23 – 00:52
Pick from preset badge layouts, recolour to match your branding, then download or email.
Narrator · 00:23 – 00:52 When you click on Print Badges, you have an option to choose from several badge layouts — like four provided here. You can choose the colour — purple or whatever you find suitable — and as soon as you are finished, you can choose if you want to send that to your users or simply download and give it to your printing agency to be printed before the event.
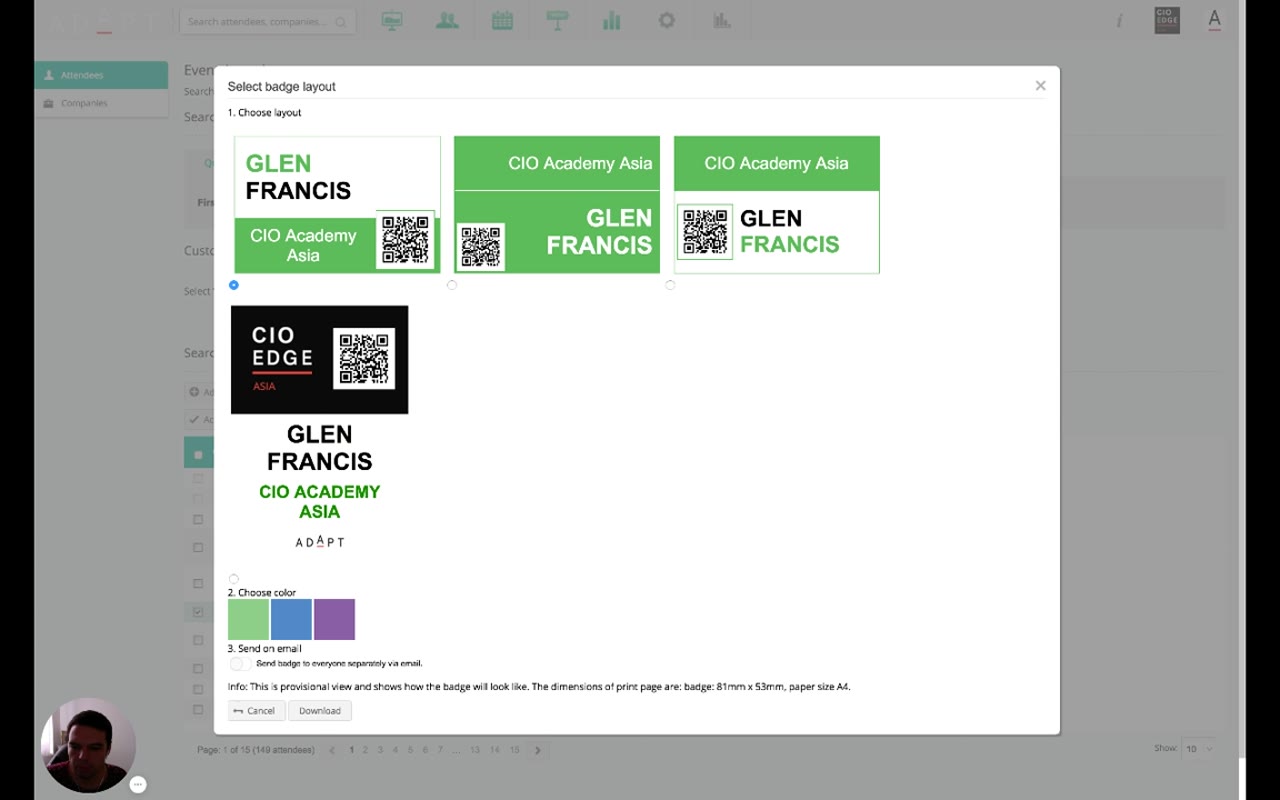
| Step | What it does |
|---|---|
| 1. Choose layout | Four preset designs (the demo shows three green variants and one dark variant). Each combines the attendee name, the company, the event branding, and a QR code differently. |
| 2. Choose color | Recolours the badge between brand options (green / blue / purple). |
| 3. Send on email | Optional — turn on to email each attendee their own badge as a PDF, instead of (or in addition to) downloading the batch. |
| Download | Produces a single multi-page PDF with one badge per selected attendee, sized 81mm × 53mm on A4 paper — ready to hand to a printer. |
4. Print Itineraries — Per-Attendee PDFs 00:52 – 01:05
Same selection-then-action pattern, with one parameter: paper format.
Narrator · 00:52 – 01:05 The same goes for the itineraries. You select the attendees and click on Print Itinerary. You choose the paper format and the system generates a PDF document for each of these attendees with their final itinerary.

The output of Print Itinerary is a PDF per attendee — useful as a backup handed out at registration, slipped into the welcome pack, or attached to a pre-event email for attendees who prefer paper.
5. Essence & Takeaways
The one-paragraph version
Module 10 is the platform's bridge to the physical event. Both Print Badges and Print Itinerary are bulk actions exposed on the Event Attendees page (Module 7) under a Print actions dropdown — you select attendees the same way you do for any other bulk action, then run the print. Print Badges opens a three-step modal: pick one of several preset layouts, pick a brand colour (green / blue / purple), and optionally toggle send to each attendee by email. The output is an A4 PDF containing 81mm × 53mm badges, ready for a printer. Print Itinerary is simpler — pick a paper format and the platform produces one final-itinerary PDF per selected attendee.
- The pre-event print runbook ("badges Friday 10am, itineraries with welcome packs Sunday").
- Brand sign-off — colour and layout choice live in this modal, so the marketing team should approve the preset combinations once.
- A reference for the printing agency on the exact page dimensions (badge 81mm × 53mm, A4).
6. Full Transcript
Verbatim narration provided alongside the video.