Module 13 of 13 · Platform Walkthrough

No-Show, Master Scheduler, Push Notifications & Reporting

The closing module covers everything that happens during and after the event itself: marking no-shows so they're excluded from re-scheduling, the Master Scheduler view that lets staff see every meeting at every table at any moment, push notifications targeted at all attendees or specific groups, and the reporting catalog that turns the platform's data into the post-event ROI artifacts.

Audience: Event Administrators, Operations, Sales Surface: No Show Delegates / Master Scheduler / Push Notifications / Reports Prerequisite: Event running with check-ins underway (Module 12)

1. No-Show Delegates & Recalculation 00:00 – 01:10

Mark anyone who didn't turn up — the engine drops them from every future re-scheduling pass.

Narrator · 00:00 – 00:26 In this final portion of the administration portal, we're going to review how we handle the no-shows and how we do the final reporting. As soon as your event is taking place and your staff members are doing the check-in for roundtables and 1-to-1 meetings, you have a section in the matching and meeting where you can see all of the no-show attendees in the system.
Not Shown Delegates page with subtitle 'List of delegates that didn't show up on event'; First Name / Last Name / Company Name / Email search filters; table with Company Name, Delegate Name, Email, Delegate Type, No Show Delegates toggle; rows alternating between toggle on (highlighted pink) and off (white); left rail showing No Show Delegates entry highlighted
Not Shown Delegates. List of every delegate, with a per-row toggle in the No Show Delegates column. Pink rows are flagged as no-show; white rows are still active. Search by name, company, or email to find a specific record. Pagination (96 records / 10 pages) at the bottom.
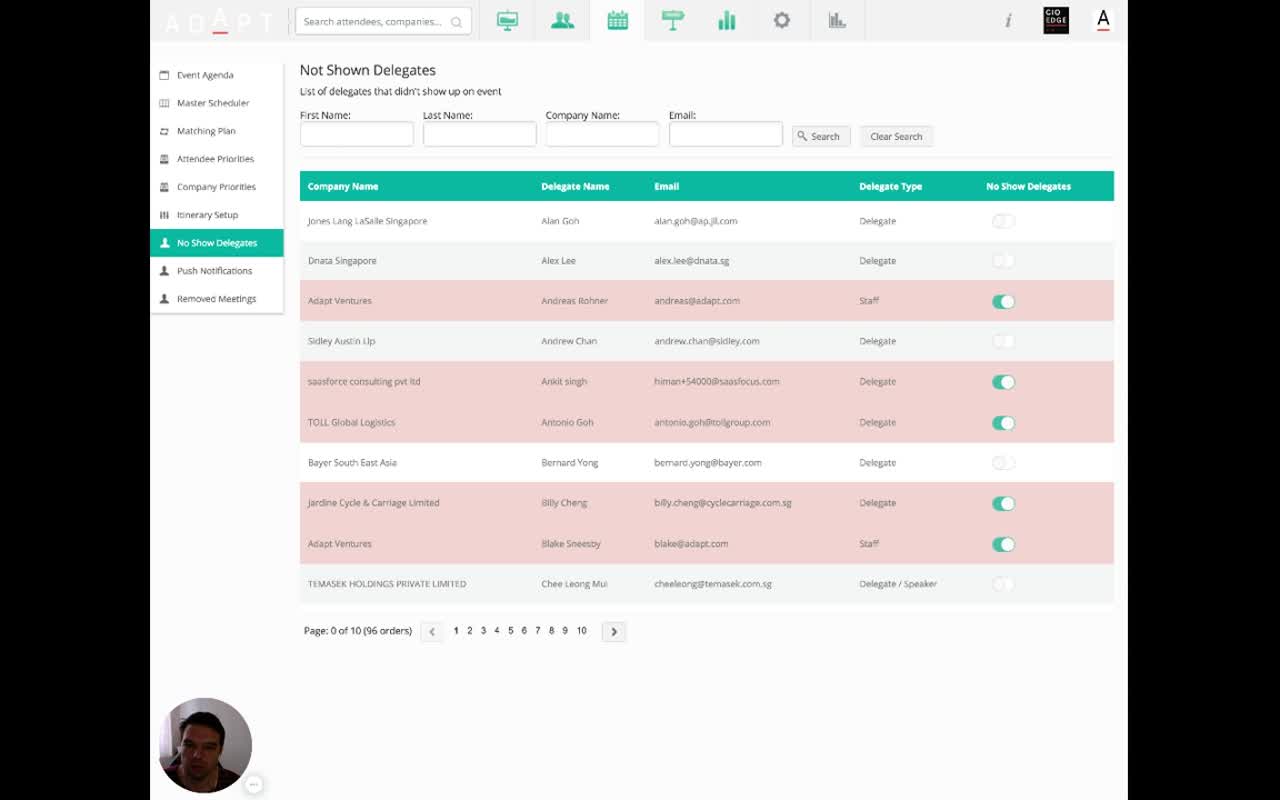
Narrator · 00:26 – 00:46 For each of these attendees, you can see if they are a sponsor or partner or a delegate. You have an option to mark them as a no-show. This information is very important because once you mark them as a no-show, the system automatically removes them from all further matching processes.
Narrator · 00:46 – 01:10 If you have an event that is spanning across three days, you don't want to have a meeting scheduled for someone who is not onsite. So by marking them as a no-show, you can then proceed and do a recalculation or reschedule the meetings for the rest of the participants who are actually onsite.
Workflow — multi-day events
For a 3-day event: at the end of day 1, run through this list, flag everyone who didn't show, then re-run the matching plan (Module 9) for days 2 and 3. The engine treats no-shows as absent, redistributing their slots to attendees who are actually on the floor — so day 2's schedule is built from real attendance, not the original assumption.

2. Master Scheduler — Live View of the Floor 01:10 – 01:30

A wall calendar of every meeting happening at every table at every minute — for staff helping attendees navigate.

Narrator · 01:10 – 01:30 Also, what is very important as a feature is the Master Scheduler. The master scheduler gives you a full overview of all the meetings happening at a given time and a given place. From here, you can see all of the meeting points or tables, and then for each of them, you can see what meetings are being held.
Master Scheduler with two top dropdowns (Select Spartner showing 'Amazon Web Services Asia Table A: 1 (4/4)' and Select Delegate showing 'Please Select'), then a calendar grid showing the sponsor's day with purple Keynote sessions and green 1-1 Appointment sessions
Master Scheduler — single attendee. Pick a Spartner from the top-left dropdown to see their entire day on the calendar grid: shared sessions (Keynotes / Roundtables) on the left in purple, 1-1 Appointments on the right in green. Color codes carry meeting type so a quick glance tells you what's happening when.

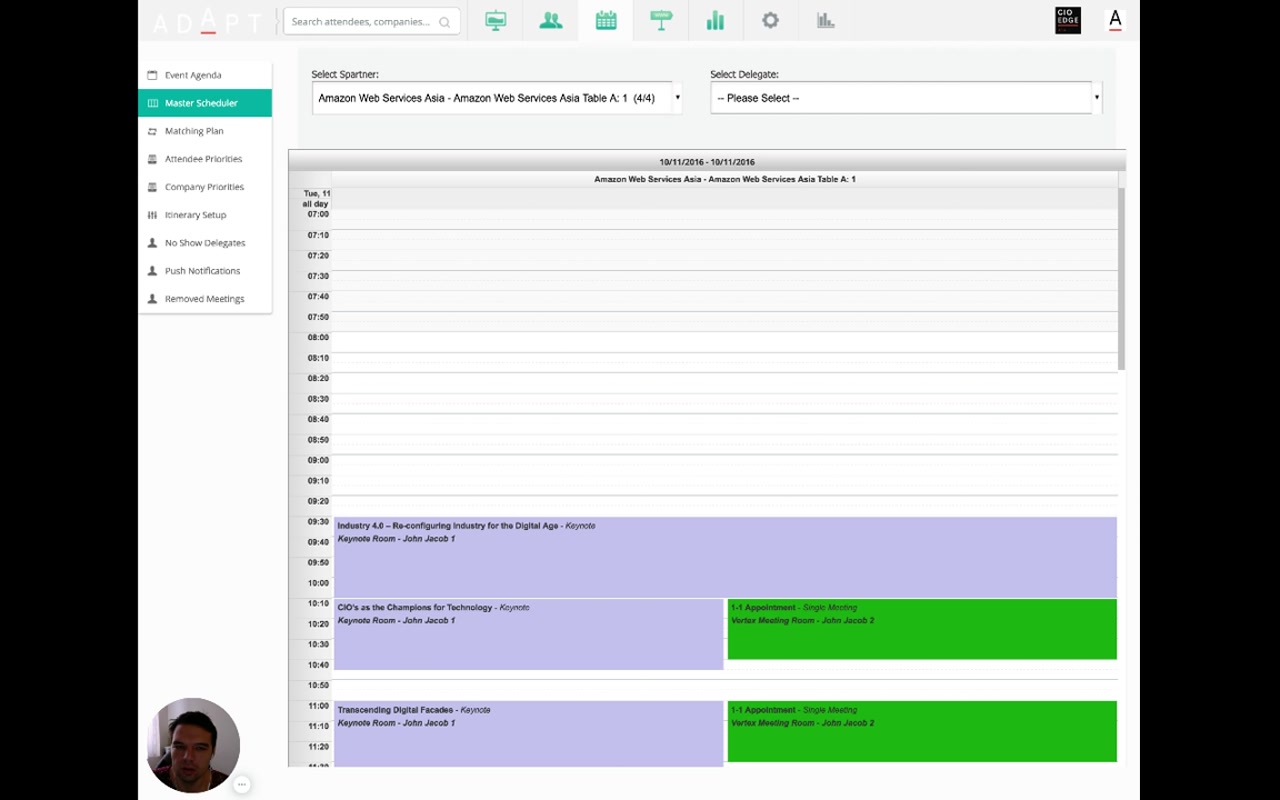
3. Comparing Two Itineraries Side by Side 01:30 – 02:00

Pick a sponsor and a delegate; see both their days lined up next to each other.

Narrator · 01:30 – 02:00 So you can see from 10:10 to 10:40, who is meeting at Table 1, Table 2, and so on. This gives you a full overview of the whole event and all the interactions happening at the same time. This is very useful for your staff members who are onsite helping the attendees.
Master Scheduler with two columns side by side — Amazon Web Services Asia Table A: 1 on the left and Banyan Tree Hotels & Resorts (Vinod Sukhija) on the right; both columns show their schedule color-coded by session type (purple Keynotes, green/pink 1-1 Appointments showing 'Meeting with X', light green Roundtables, blue session); time runs vertically from 10:50 to 16:30+
Master Scheduler — two attendees side by side. Picking both a Spartner and a Delegate at the top brings up two day-columns side by side. Color codes match — purple for keynotes, green / pink for 1-1 appointments (with "Meeting with [counterpart]"), light green for roundtables. This is the canonical "is this delegate due to meet this sponsor in 5 minutes?" view that staff use during the event.

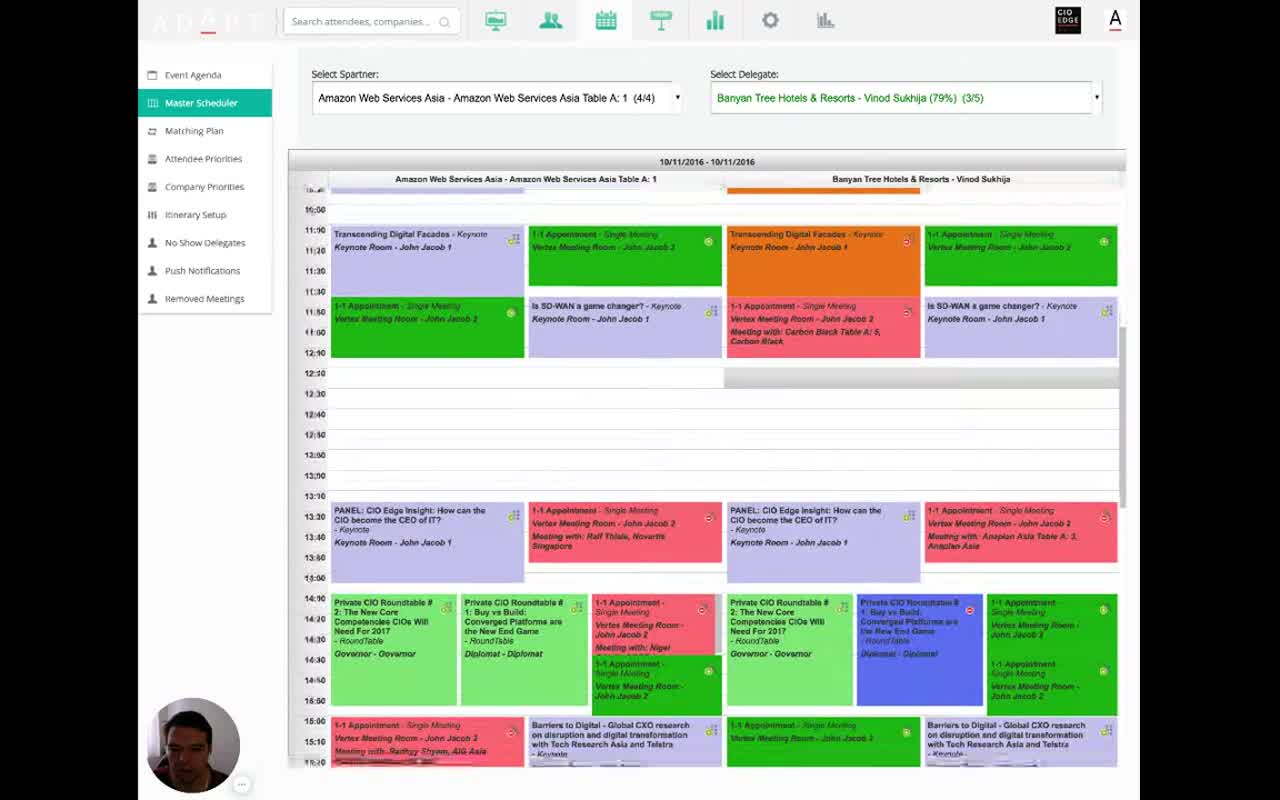
The two-column view makes it trivial to spot when two specific attendees are due to meet, where, and what either is doing in any other slot. For very busy sponsors with many tables, it cuts the time staff spend hunting through individual itineraries.

4. Push Notifications 02:00 – 02:22

Send an instant message to all attendees, or to a specific group.

Narrator · 02:00 – 02:22 From here, as well, you have an ability to send push notifications. Push notifications can be sent to all participants, or you can even target specific groups like only partners or only delegates. You can put the title and the message, and then once you click "Send," it will be delivered to their mobile devices instantly.
Push notifications page with two top tabs (Pending Notifications selected / Sent Notifications); table with columns Person Type, Company, Person Name, For meeting with, Send (button per row), Delete (button per row); rows showing pending meeting notifications between Sponsors and Delegates
Push Notifications. Two tabs at the top — Pending Notifications (per-meeting reminders ready to send) and Sent Notifications (history). Each pending row carries the recipient (person type, company, person), the meeting it's about, and per-row Send / Delete controls. Broadcast push (to all attendees or to a targeted group like "only partners" / "only delegates") is composed with a title and message and delivered to attendees' mobile devices instantly.
Push typeUse it for
Per-meeting remindersListed on the Pending Notifications tab — one row per upcoming 1-to-1; staff send these slot-by-slot or in bulk to nudge attendees ahead of their meetings.
Broadcast — All attendees"Lunch is now open in the Ballroom Foyer." A title and a message; everyone gets it.
Broadcast — group-targeted"Sponsors: tables open at 13:30, please be seated by 13:25." Targets a specific attendee type only.
Narrator · 02:22 – 02:46 This is very useful for important announcements, like if there is a change in the agenda or if you want to remind everyone that the next session is about to start. And finally, you have the reporting section. The reporting section gives you a set of reports that you can download and use for your post-event analysis.

5. Reporting 02:22 – 03:10

Three columns of pre-built reports — meetings, attendees, and post-event analytics.

Reports page organized into three columns: MEETINGS AND ITINERARY (Meeting Scheduled Report, Group Meetings Capacity Report, Session Attendees Report, Itinerary Summary Report, Max vs Scheduled Meetings); ATTENDEES (Attendee Preference Report, Attendee Update Preference Report, Attendee Profile Completeness Report, Attendees Not Scheduled Report, Checklist Report, Attendees Login Report, Strategic Partner Upload Materials, Delegate Metrics Report); OTHER (Services And Products Quantitative Report, Common Interest Report, Time Gap Report, Selected Investment Priorities Report, Meeting Room Report, Informal Meeting Report, Delegate Investment Priorities Report, Push Notifications Report)
Reports catalog. Organized in three columns — Meetings and Itinerary, Attendees, Other — with one report per row plus a one-line description.
GroupWhat's in it
Meetings and ItineraryMeeting Scheduled Report, Group Meetings Capacity Report, Session Attendees Report, Itinerary Summary Report, Max vs Scheduled Meetings.
AttendeesAttendee Preference Report, Attendee Update Preference Report, Attendee Profile Completeness Report, Attendees Not Scheduled Report, Checklist Report, Attendees Login Report, Strategic Partner Upload Materials, Delegate Metrics Report.
OtherServices And Products Quantitative Report, Common Interest Report, Time Gap Report, Selected Investment Priorities Report, Meeting Room Report, Informal Meeting Report, Delegate Investment Priorities Report, Push Notifications Report.
Narrator · 02:46 – 03:10 You can have reports on the amount of meetings, the feedback from the sessions, the ratings of the speakers, and even the business cards being exchanged. All this data is available in several formats like PDF or XLS, so you can easily process that and provide your sponsors and partners with the ROI reports.
Why this is the close-out step
Every dollar a sponsor spent boils down to a number in one of these reports — meetings delivered, attendance %, services and products engagement, push notifications acknowledged, business cards exchanged. The reporting catalog is the platform's promise to sponsors that the hosted-buyer experience produces measurable, exportable evidence of ROI.

6. Essence & Series Wrap-Up

The one-paragraph version

The closing module covers four during-and-after-the-event surfaces. No-Show Delegates is a list with per-row toggles — flagging an attendee removes them from every future matching pass, so a multi-day event can re-run scheduling against actual attendance. Master Scheduler is a calendar view that picks one or two attendees by dropdown and renders their day(s) side by side with color-coded meeting types — the staff's go-to "where is whom right now" view. Push Notifications handles both per-meeting reminders (the Pending tab) and broadcast announcements with a title + message, targetable at all attendees or a specific group like "only partners". Reporting is a catalog of around 20 pre-built reports across three groups — Meetings & Itinerary, Attendees, and Other — exportable in formats like PDF and XLS. Together this is the platform's commitment to turning the hosted-buyer event into measurable ROI for every sponsor on the floor.

Narrator · 03:10 – 03:19 So that completes the full walkthrough of the platform. I hope you found this whole series useful and that it gives you a good understanding of how it can help you manage and deliver successful events!

End of the platform walkthrough series — 13 modules total

Documentation now exists for every module: 1. Dashboard · 2. Forms · 3. Event Plan · 4. Agenda · 5. Delegate Panel · 6. Sponsor Panel · 7. Search & Data · 8. Priorities · 9. Scheduling · 10. Print · 11. Mobile (Delegate & Sponsor) · 12. Mobile (Staff) · this page.

7. Full Transcript

Verbatim narration provided alongside the video.

Show / hide transcript
00:00 – 00:26
In this final portion of the administration portal, we're going to review how we handle the no-shows and how we do the final reporting. So as soon as your event is taking place and your staff members are doing the check-in for roundtables and for 1-to-1 meetings, you have a section into the matching and meeting where you can see all of the no-show attendees into the system.
00:26 – 00:46
So for each of these attendees, you can see if they are a sponsor or partner or if they are a delegate. And then you have an option to mark them as a no-show. This information is very important because once you mark them as a no-show, the system automatically removes them from all further matching processes.
00:46 – 01:10
So if you have an event that is spanning across three days, you don't want to have a meeting scheduled for someone who is not onsite. So by marking them as a no-show, you can then proceed and do a recalculation or reschedule the meetings for the rest of the participants who are actually onsite.
01:10 – 01:30
Also, what is very important as a feature is the Master Scheduler. The master scheduler gives you a full overview of all the meetings happening at a given time and a given place. So from here, you can see all of the meeting points or tables, and then for each of them, you can see what meetings are being held.
01:30 – 02:00
So you can see from 10:10 to 10:40, who is meeting at Table 1, Table 2, and so on. This gives you a full overview of the whole event and all the interactions happening at the same time. This is very useful for your staff members who are onsite helping the attendees.
02:00 – 02:22
From here, as well, you have an ability to send push notifications. Push notifications can be sent to all participants, or you can even target specific groups like only partners or only delegates. You can put the title and the message, and then once you click "Send," it will be delivered to their mobile devices instantly.
02:22 – 02:46
This is very useful for important announcements, like if there is a change in the agenda or if you want to remind everyone that the next session is about to start. And finally, you have the reporting section. The reporting section gives you a set of reports that you can download and use for your post-event analysis.
02:46 – 03:10
You can have reports on the amount of meetings, the feedback from the sessions, the ratings of the speakers, and even the business cards being exchanged. All this data is available in several formats like PDF or XLS, so you can easily process that and provide your sponsors and partners with the ROI reports.
03:10 – 03:19
So that completes the full walkthrough of the ExpoStudio platform. I hope you found this whole series useful and that it gives you a good understanding of how ExpoStudio can help you manage and deliver successful events!